How to prepare a panel for oil painting

Have you ever imagined the surfaces upon which the masterpieces of Giotto, Leonardo, and Raphael were painted? Have you ever wondered how these were prepared, or where they came from? Have you ever fancied yourself painting onto an exquisite, ivory-like surface rather than the dull, mass produced cotton canvases from your local art shop?
Read on to learn the traditional methods for making your own rabbit skin glue (size), gesso (primer) and applying it to a wooden panel for oil painting. It’s worth the time and effort, I promise.
In this article I describe the following:
Overview
You will need:
Surface:
A wooden panel. Ideally flat and smooth
Gesso and size:
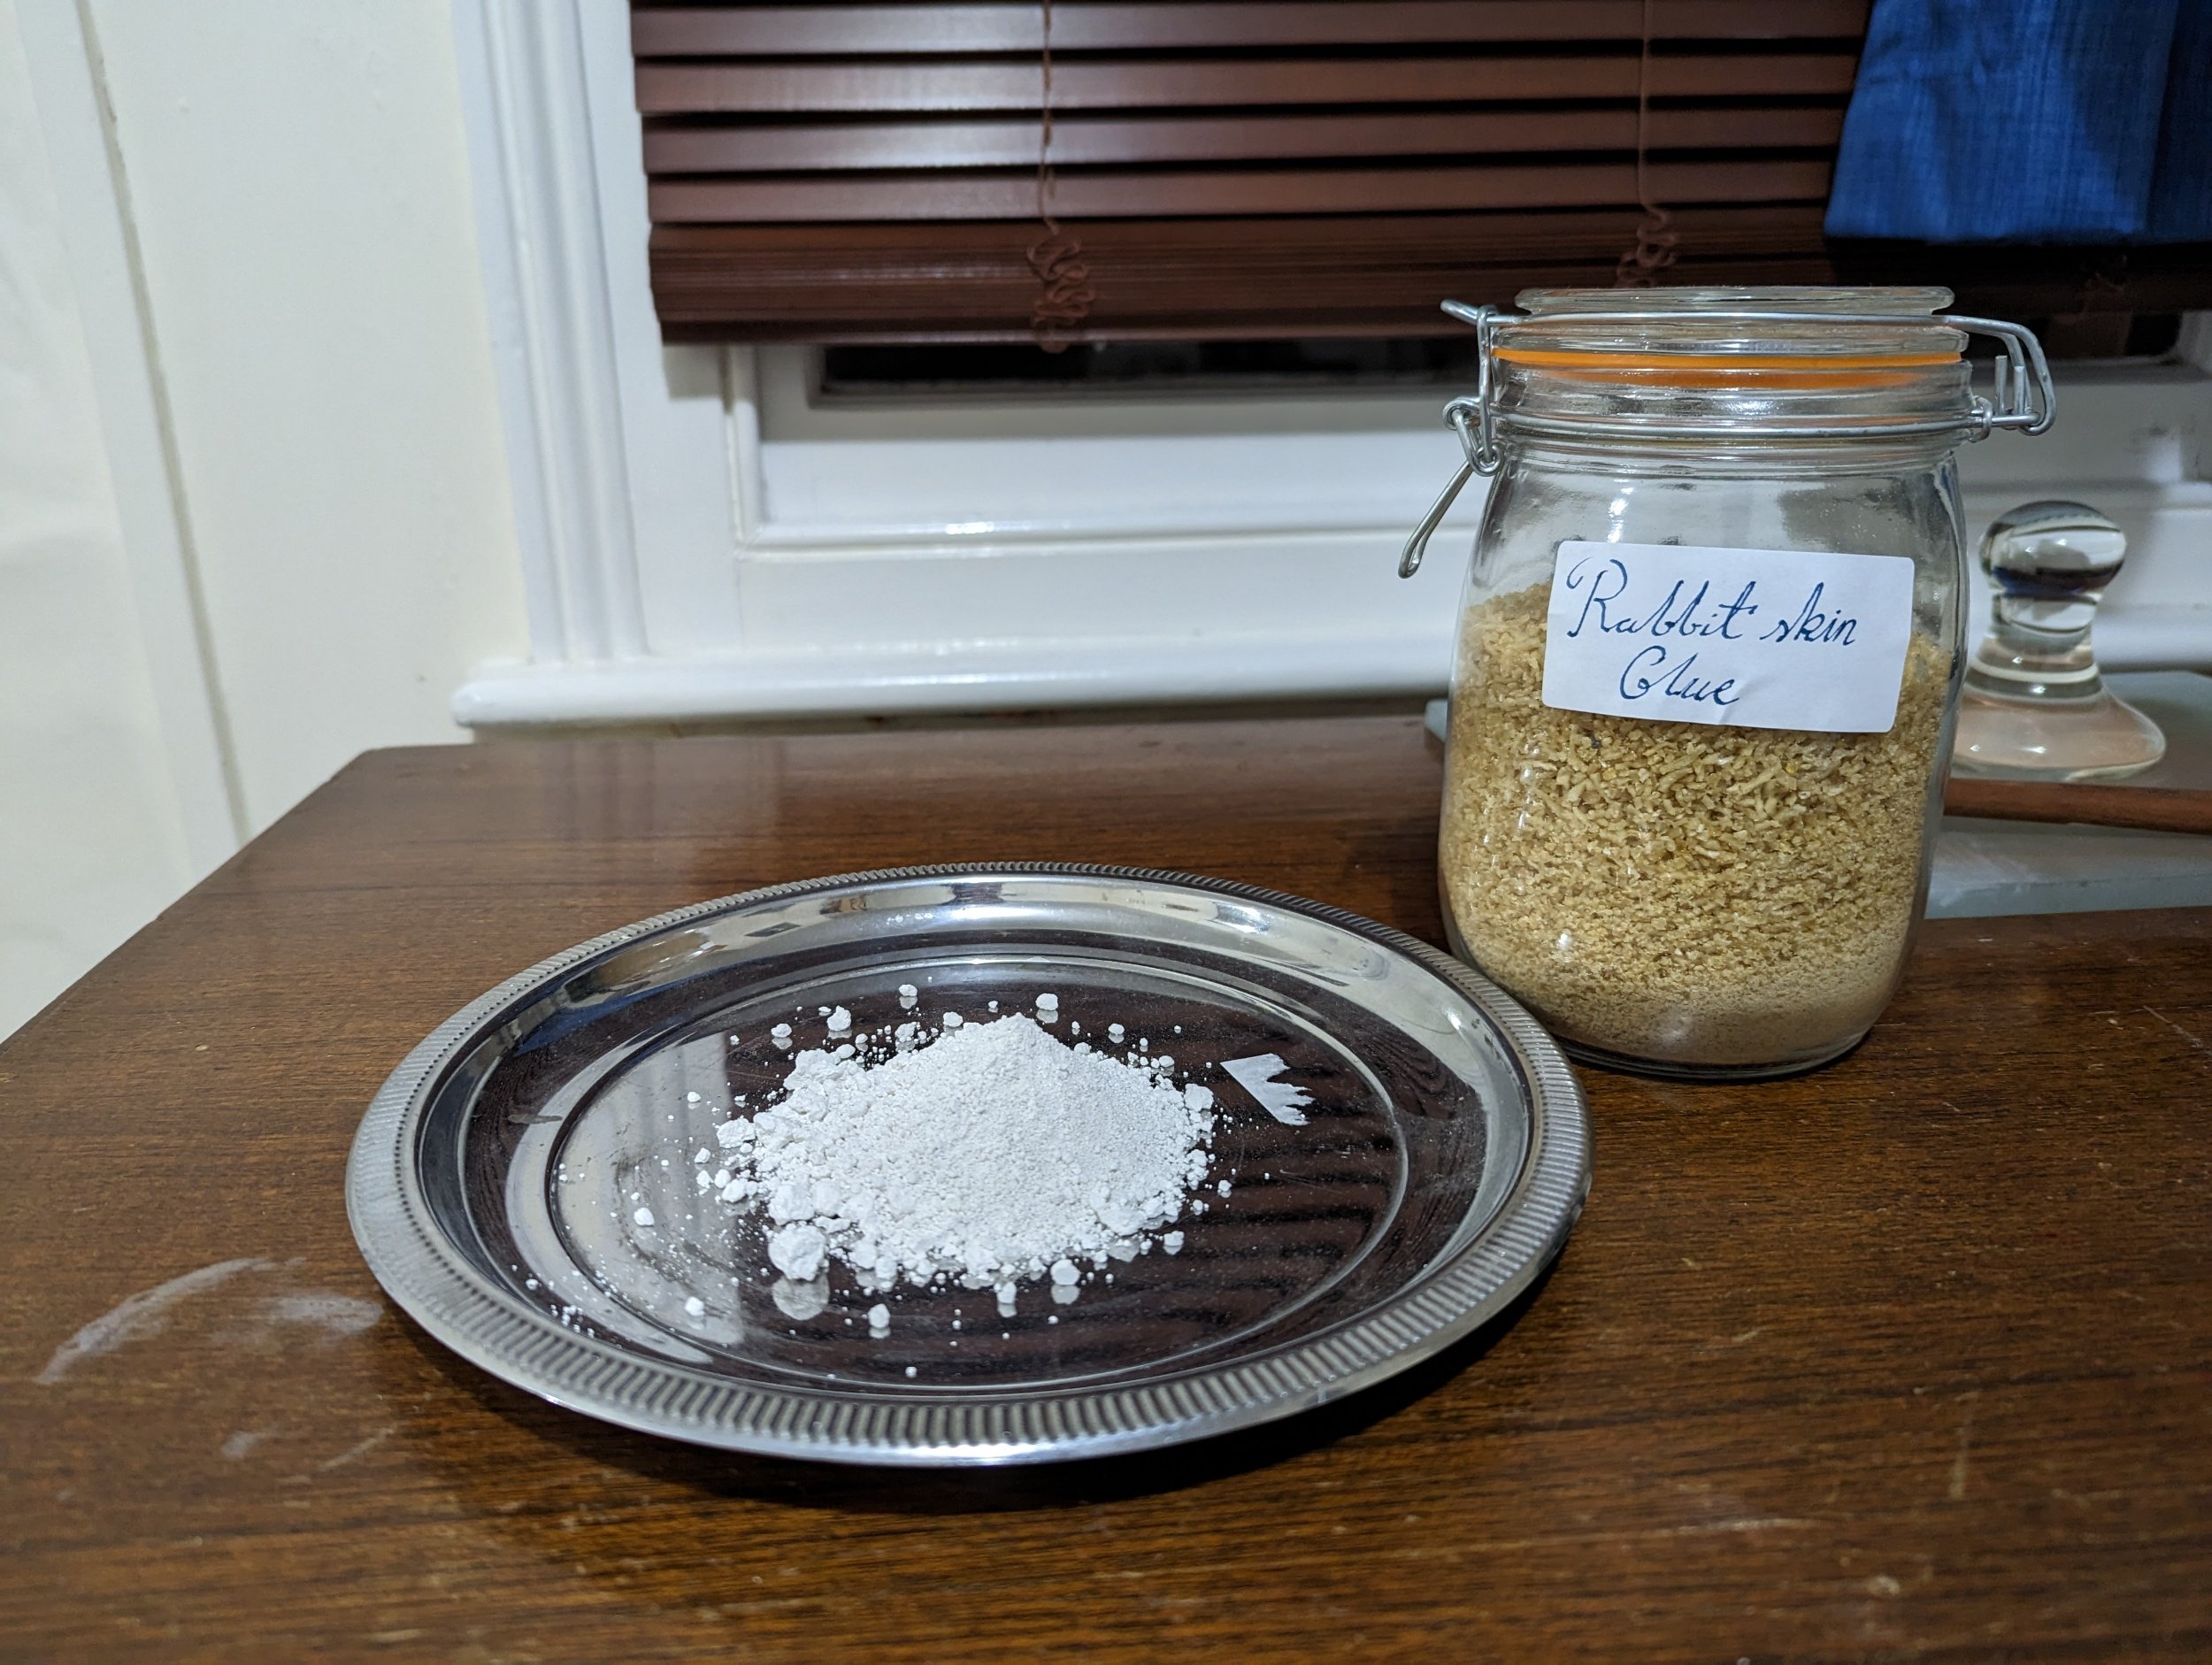
Gypsum or chalk (calcium carbonate or calcium sulphate)
Rabbit skin glue
A broad, soft brush
Measuring scales
A hot plate
A big mixing bowl
A pair of tights
Sandpaper of various grit
A wooden spoon
A flat horizontal surface big enough to support your panel
For the imprimatura:
Earth pigment
Dammar varnish
Turpentine (or lavender spike oil)
A soft, clean cotton cloth
1. Prepare the panel

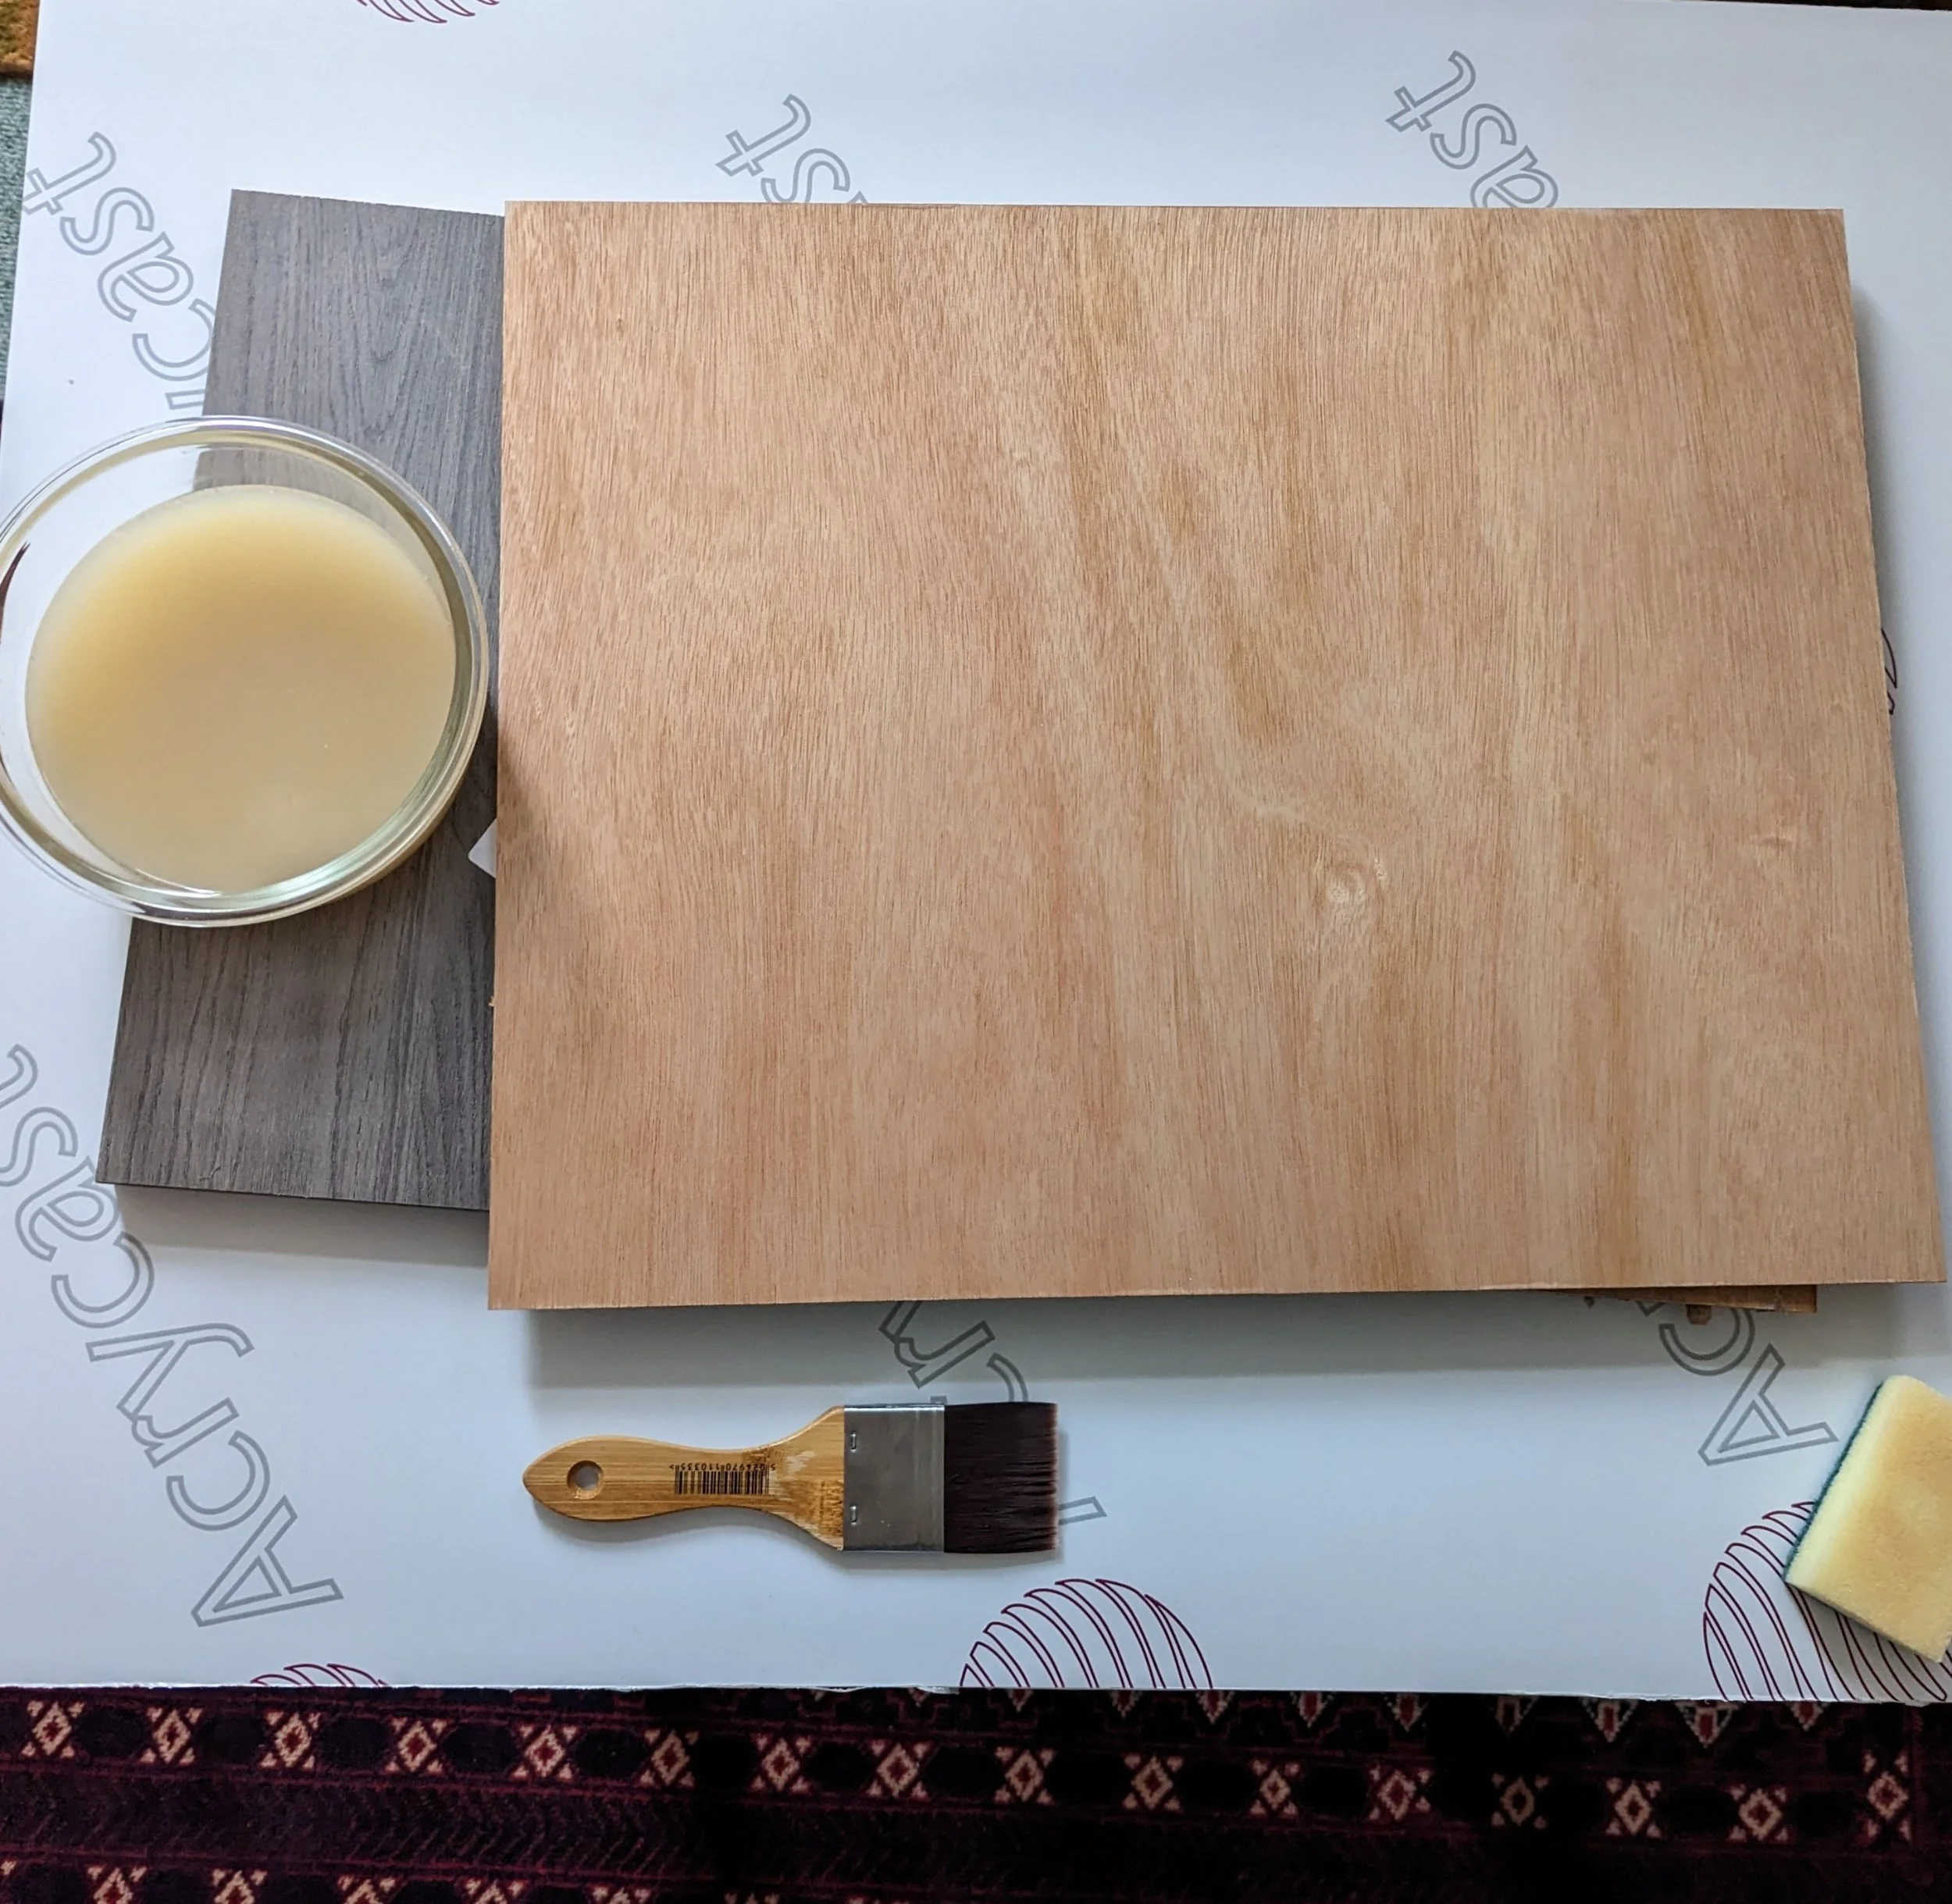
Before the gesso ground is applied, it is important first to prepare the surface of the panel. Ensure that the top surface is clean, flat, and smooth. You will want to leave a little bit of “key” for the gesso to hold, so don’t bring the surface to a perfectly polished finish. I typically find that working up to a 600-800 grit sandpaper works well. The panel shown in the pictures above is poplar veneer mounted onto an mdf backer - which I have found to work well with little to no warping during the preparation.
2. Prepare the rabbit skin glue


Next, you will need to prepare the rabbit skin glue. This will be used both to size the panel and to form the binding medium for the gesso.
Rabbit skin glue is typically available as dried granules, or pre-made as a jelly. Below, I describe how the glue is made fresh from the granules.
Step 1: Measuring and soaking the rabbit skin glue granules
Mix dried rabbit skin glue granules and cold water together in a sealable jar or bowl, in a ratio of 1:20 (glue:water) by weight.
Leave these to soak overnight.
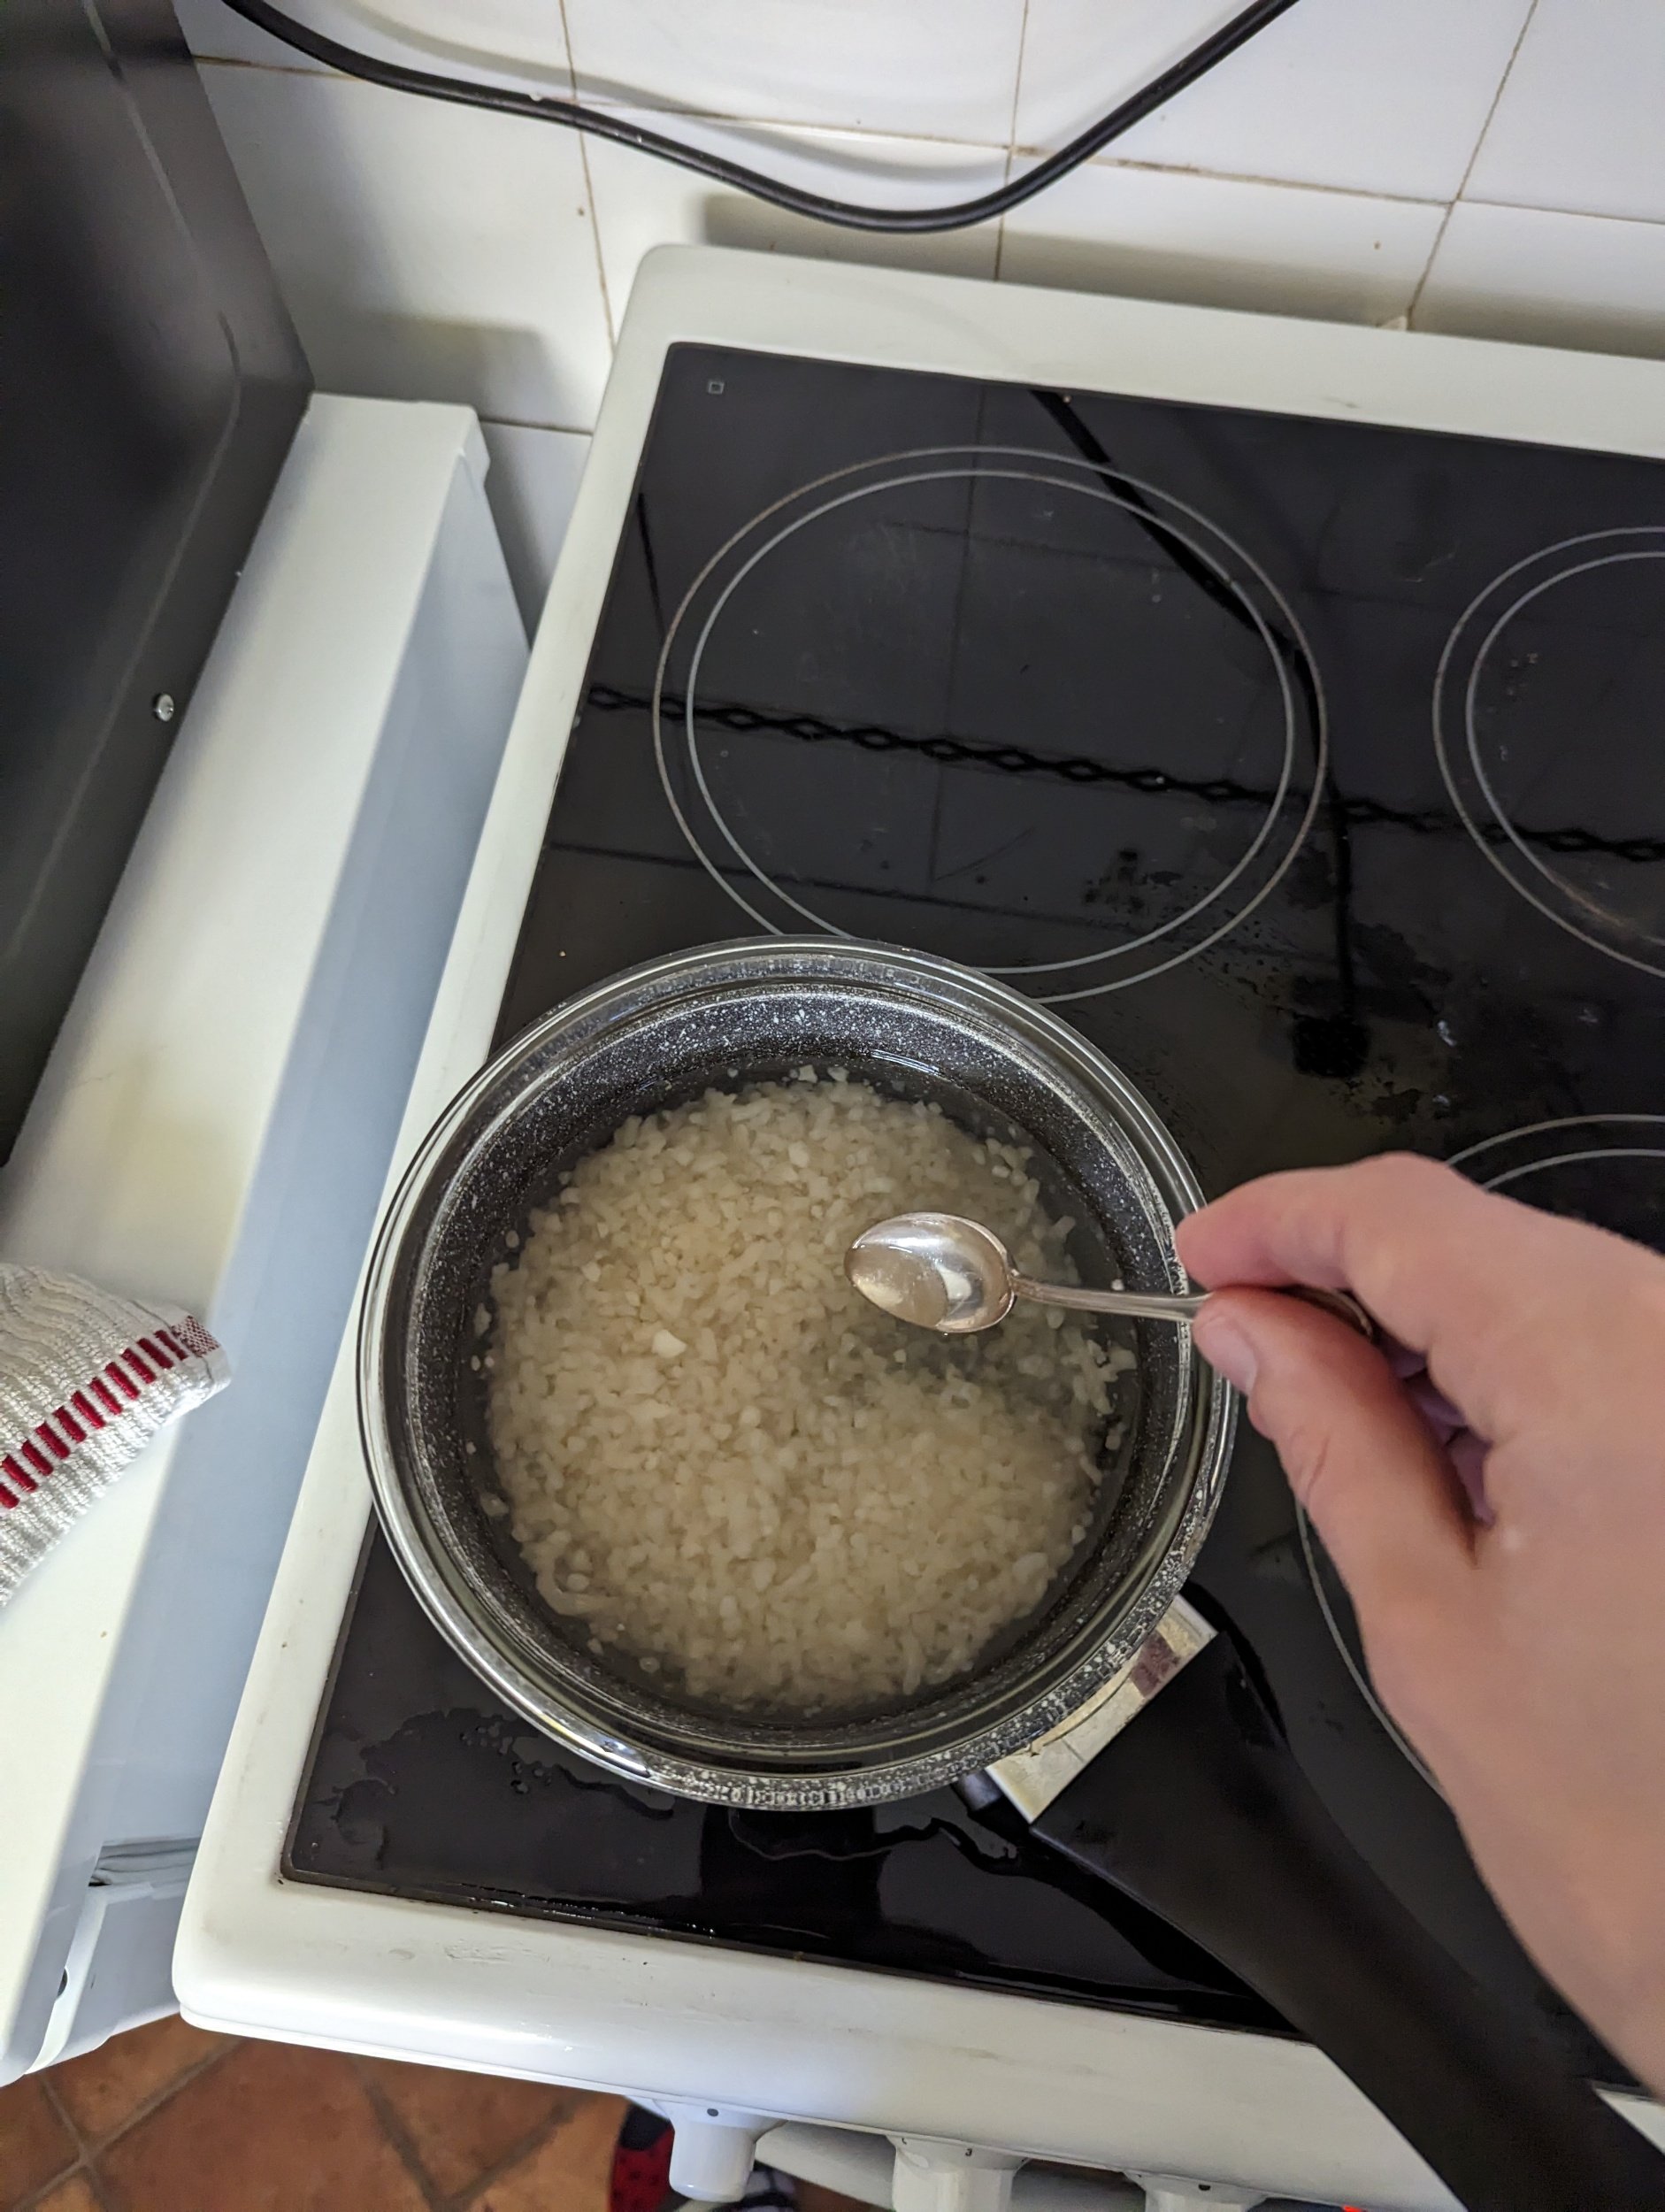
The following morning, after soaking, the granules should have swelled and the overall mixture should have the appearance something approximating to oatmeal.
Step 2: Heating to make the liquid glue
Next, the lumpy mix needs to be heated carefully to dissolve the collagen based granules into the water. This is done using a double boiler.
Fill a saucepan half way with warm water.
Place the jar of rabbit skin + water into the pan. This forms a double boiler. Note, don’t add the water and granules directly into the pan - the double boiler approach ensures a more even and gentle heating of the overall mixture. There is a risk that if you heat the mixture directly, hot spots may form at the bottom surface of the pan and damage the binding properties of the glue.
Heat the saucepan gently, making sure that the water never reaches the boil.
It is important that the temperature of the rabbit skin glue mixture does not boil. Ideally, it shouldn’t even exceed 60-70 degrees (Celsius). By placing it in the double boiler described above, you ensure that the mixture is heated evenly and gently. With some patience, you will find that the granules will all dissolve even at a relatively mild water temperature. Don’t rush this step.
4. Stir the mixture gently until the granules are all dissolved into the water. The mixture should now have the appearance of a runny chicken soup.
The glue is now ready. If you allow the glue to cool, it will form a jelly-like substance. Do not worry - it is perfectly okay to re-heat the mixture and in doing so it will form its liquid state. But make sure to heat it again gently and stir.
(Tip: for checking the strength).
The potency of rabbit skin glue granules varies from supplier to supplier, and it is important that the concentration of your mixture is correct. Therefore, the above suggested ratio of 1:20 (by weight) is only an approximate starting point. Experimentation and experience will allow you to adjust the mixture to perfection in time.
A slightly empirical, albeit still remarkably useful technique to gauge the strength of the glue is the following. Allow the glue to cool, thus forming a solid jelly. Push your forefinger and thumb into the jelly while opening the two, forming a crevasse in the jelly. The feeling of the walls of the crevasse should be jelly-like, but slightly granular. If the glue has the texture of pure jelly, it is too strong and should be diluted with warm water ever so slightly. If it has the texture close to that of a liquid, it is too weak and additional rabbit skin glue granules need to be dissolved. (Note here, that merely adding granules will not work - they first need to be soaked overnight as before).
3. Size the panel
Before applying any layers of gesso or paint, the panel must first be sized. This is to prevent oils leaking into the fibres of the wood causing “rot” over time due to their acidic nature. A protective barrier of pure glue is therefore applied first.
Lay the panel flat and slightly elevated from your work surface (to avoid sticking the panel to your tabletop)! Make sure to lay down some newspaper or sheeting below the panel for the inevitable drips of glue over the edge of the panel.
Apply the liquid rabbit skin glue while still warm in two coats using a broad brush. It can be beneficial (depending on the wood) to dilute the rabbit skin slightly for the size. Typically a ratio of rabbit skin granules to water of 1:25 by weight works well. Apply the first coat in one direction, and the second coat in a perpendicular direction to the first, to ensure that you work the glue into all of the wood fibres. Don’t worry too much about the quality of the finished surface after this step - the most important point is that the glue is applied all over the panel and no area is left exposed. Of course, the neater and more uniformly applied the glue, the better.
Leave approximately 1 hour (depending on temperature and humidity) between coats, allowing the glue to soak into the wooden fibres and seal the surface. Leave a couple of hours after the second coat before proceeding to applying the gesso ground.
4. Make the gesso


To save time, you can make the liquid gesso while the size is drying.
Weigh out the glue and chalk in a 1:1 ratio by weight. I’m using gesso di bologna here, which is calcium sulphate rather than calcium carbonate, although both are absolutely fine. Despite being very similar, with time and experimentation, you will likely form a preference for one over the other depending on your method of painting.
Mix the two together thoroughly and stir. Keep warm as you do so to aid dissolution and suspension. Again, since the medium here is the rabbit skin glue, it is critical that the liquid does not get too hot.
Once all of the chalk is dissolved into the liquid mixture, strain the material through a fine sieve to remove any large lumps and impurities. I find that a pair of fine tights works extremely well and allows you to squeeze the remnants through the mesh if needed. Warning - the tights will be absolutely ruined after this and destined for the bin! Probably wise to check with the owner of the tights before proceeding with this step!
The final product of this step should be silky smooth, with a consistency approximating that of single cream. Over the course of the day, the liquid will cool and solidify - but don’t worry. You can always reheat it when needed before application, but add a teaspoon or two of water each time to compensate for any evaporation that has occurred in the interim.
5. Application to the panel


Now comes the application of the gesso to the sized panel. Make sure the size is fully dry before proceeding to this step.
First, give the panel a very light sand with an ~800 grit sandpaper and then wipe it with a dry cloth to remove any dust.
Next, I strongly recommend lightly dampening the surface of the panel with a sponge just before applying the gesso. You will find that the gesso will dry very quickly when leaving the brush; trying to get a smooth finish directly onto a dry surface is almost impossible. Lightly dampening the surface prior to brushing gives a much easier surface to brush evenly onto. Do not soak the panel however!
The first coat should be applied thinly. It will look awful when it dries, as though you did something wrong - but don’t worry, this is normal. (See the first picture above).
The second coat, and every coat thereafter can be applied slightly thicker if you wish, but again err on the side of multiple thin coats over fewer thick ones. Very thick coats in the long term may be more prone to cracking or delaminating. Leave at least an hour between coats for the surface before to dry fully. This can be quite quick in hot climates, but can take over 2 hours in cooler/damper ones. Don’t be tempted to try and accelerate the drying process using a hairdryer or radiator - this will simply lead to cracking.
Apply each coat in a perpendicular direction to the preceding one. For example, if the second coat is applied vertically (in the portrait direction) apply the third horizontally (in landscape).
Very gently sand each coat once it is dry before applying the next layer, using increasingly fine grades of sand paper. This hierarchy of “key” with each coat will ensure that each layer is well adhered to the one beneath it. Not many guides recommend this sanding step between coats, but I do find that it gives a superior final surface. Again, wipe any loose dust from the surface with a cloth and dampen the surface lightly before applying the gesso.
(Regarding sandpaper, use silicon carbide sand paper if you can - harder and less likely to deposit any unwanted stains to the ground. Unlike the red or green sandpaper you can sometimes buy, which can sometimes find its way into your perfectly white surface!)
You will find that while waiting between coats, the gesso mixture may form a skin. This is not a problem, simply warm the mixture in your double boiler and stir to return it to its liquid state. Add a teaspoon of water each time you do to compensate for any evaporation.
For large panels, it may be worth also damping the back of the panel before each coat too. This will encourage an even rate of contraction and expansion with water content on both the top and bottom of the panel. An uneven level of expansion on only one surface may lead to warping or bowing of the panel.
The final layers
Depending on the type of surface you enjoy working on between 6-15 coats of gesso may be necessary. (Also depending on how thickly you apply each coat of gesso). I have personally found 10-12 coats to be perfect for my work.
To get a wonderful ceramic or “billiard ball” like finish, a technique suggested by some old manuscripts involves rubbing the top surface with a damp, clean cotton cloth, while pressing very hard into the surface. This effectively re-dissolves the upper most surface, compresses it and allows it to set in a perfectly flat and hard form. I personally haven’t used this method, since I still like a little bit of tooth - but for some styles this could be a powerful finishing step. A light sanding with a high grade sand paper (1000+) for me brings the surface to a perfect finish.
Once complete, allow a full day for the panel to dry fully before proceeding to the imprimatura or painting.
6. (Optional) Imprimatura


An imprimatura is a thin coloured layer that is often applied over the otherwise white background of the gesso. Many artists find painting over a mid-tone significantly easier than onto pure white. I tend to agree in most cases. In doing so, it is possible to make very quick progress with a picture in the early stages with simply adding highlights and shadows where needed, leaving the imprimatura underlayer exposed as a neutral mid-tone.
An imprimatura can also be used to seal an underdrawing to the panel. I have not done this in this case, although I do use the technique if I am working from a preparatory sketch. For this, you would typically transfer your preparatory drawing onto the white panel - using for example, an ink or tempera medium to reinforce the drawing. Once dry, you would at that stage add the coloured imprimatura. Being transparent, you can still see the underdrawing however, sealed beneath the oil/resin layer the underdrawing will not be disturbed by subsequent paint layers. Leonardo is well known for using this technique in addition to many of the great northern painters.
Imprimatura recipe:
Dammar varnish
Turpentine (or lavender spike oil)
Pigment
Application:
Mix the dammar varnish and solvent (either turpentine or lavender spike oil works fine) in a 50:50 by volume ratio. Add pigment to the mix and ensure that the combination is mixed thoroughly. Apply the mixture to the gesso panel using a clean white cotton cloth. A brush of course works fine, but you will be able to cover much more area much quicker using a cloth. The solvent will evaporate quickly so you have to work with a little speed, but there is no need to rush. I often like to leave some of the marks from the cloth on the panel to leave the opportunity for inspiration from the Rorschach inkblot effect, occasionally. If you prefer a perfectly uniform coating, this is of course absolutely fine and simply requires some smoothing with the cloth or a soft brush to remove the marks.
Leave for a full day to dry before the first paint layer, or longer if possible.
The choice of pigment for the imprimatura is completely up to you. Earth pigments work well since they are typically fast drying and when applied thinly give quite a neutral mid tone. In the example above, I use raw sienna, but I also frequently use raw umber, Cassel earth, or a grey (mixture of lead white and vine black). The colour of this layer, although unlikely to be directly visible in the final painting, will influence the balance and colour of the finished picture and is ultimately down to personal preference.
7. Bonus tips
Once you are happy with the process, prepare multiple panels at once. The whole process (excluding the overnight soaking of the rabbit skin granules) will take a full day anyway - so you may as well prepare 5-6 panels in one go.
Put a pencil mark on the back of each panel after each coat to keep track of the number of coats on each panel. It’s very easy to lose track after number 5-6! Use vertical and horizontal marks so you can easily remember which direction the next coat should be brushed on.
Any comments or questions?
I hope this quick guide is useful. As always, feel free to leave comments in the section below, or message me directly here.